I continue to cry every time I read or watch coverage of the Sandy Hook tragedy. I know everyone wants to reach out to help those parents and family members that lost their little angels in any way that we can. That's why I was so happy to hear about Operation Sandy Hook. Small Fry and Brickyard Buffalo have teamed up along with other artists and graphic designers, and are offering a collection of downloadable prints, all at $5 each. Profits will go to the Sandy Hook School Support Fund through United way.
How To Design Your Own Holiday Cards
So, this isn't really related to home decor; but I thought I'd share this little tip for fun! When I'm sending out holiday cards or party invitations I don't like spending lot of money. And if you pay for a design, envelopes, postage, printing costs - it all adds up quickly!
So to save a little scratch, I like to design my own. And you really don't need any fancy skills or fancy programs to do it. I like to use the free online program picmonkey.com. I am not a paid advertiser for Picmonkey, I just really like the program! It is fairly new, so everything is free right now; but eventually they will start charging for some of the premium options.
Anyway, it's super easy to use. Here is how I made my Christmas card this year!
Step One: Click on "Create a Collage"
So to save a little scratch, I like to design my own. And you really don't need any fancy skills or fancy programs to do it. I like to use the free online program picmonkey.com. I am not a paid advertiser for Picmonkey, I just really like the program! It is fairly new, so everything is free right now; but eventually they will start charging for some of the premium options.
Anyway, it's super easy to use. Here is how I made my Christmas card this year!
Step Two: Change the pixel size. This is so when you go to have your photo cards printed, they will be the correct size and will not have to be cropped. To make 5x7 prints, your pixel size needs to be 2100x1500.
Step Three: Now that your sizing is correct, add your photos. I chose several photos so that I could play around with the design and see what I liked best. You don't have to use every photo that you upload. Also note here that I uploaded a blue wood grain design background. I got this by simply googling "Digital Scrapbook Freebies Christmas" and found several free digital scrapbook kits with all kinds of cute background designs. The blue wood grain design I used is from The Merry Little Christmas Mini Kit from Design House Digital.
Step Four: Once you have your pictures and background loaded, you need to save your file. I call this the "base design".
Step Five: You save a "base design" because for some reason Picmonkey doesn't let you add any text or symbols to collages, so you have to save the file as a blank design, and then reopen it in Picmonkey as a single photo. You do this back at the main Picmonkey screen:
Step Six: Now that your "base design" is open in Picmonkey, you can see it looks the same as the collage screen; but there are different options on the left. To add text to your design choose the "P" button. Now have fun adding text and symbols to complete your design! When you're all finished, save the file to your computer and simply have them printed anywhere that prints photos. I use Costco.
Picmonkey has all sorts of different fonts and symbols/clipart to choose from and the possibilities are endless. Here is what my Christmas card looked like when I was finished. Even if I wasn't trying to save money I'd probably still design my cards this way because I think it is super fun. I used the same method to make my daughter's birthday card this year.
Hope this helps some of you, have fun!
Surprising Finds at Kohl's
Anyone still out there? I've have zero good excuses for why I haven't been blogging. Are blogs still cool? Seems like it's all about Instagram and Facebook these days, and I follow a lot of funny people on Twitter but haven't had the guts to post on it myself yet. I know you were all dying to know my thoughts on social media so you're welcome!
Let us move on to more important matters, and that is Kohl's. Good ol' Kohl's; always good for a laugh. I usually find nothing there but the occasional surprisingly cute shoes. Well I was pleasantly surprised again the other day when I found a really cute shower curtain for my daughter's bathroom! It was from the brand Sonoma Life + Style, and when I got online I found several other cute home decor items from the same line.
Let us move on to more important matters, and that is Kohl's. Good ol' Kohl's; always good for a laugh. I usually find nothing there but the occasional surprisingly cute shoes. Well I was pleasantly surprised again the other day when I found a really cute shower curtain for my daughter's bathroom! It was from the brand Sonoma Life + Style, and when I got online I found several other cute home decor items from the same line.
The Evolution of an Art Wall
When talking about arranging art and photos on a wall, so many times I hear friends and clients say they haven't hung anything because they're scared they'll do it wrong or that it won't look good. So instead they have blank walls. But the thing is, what's the worst that could happen? You hang something and it looks bad? Then take it down and try something else. Believe me, it's very easy to fill nail holes.
To illustrate my point, I'm going share with you some really ugly wall arrangements (and crappy photos) by yours truly. One wall in my living room has gone through many changes.
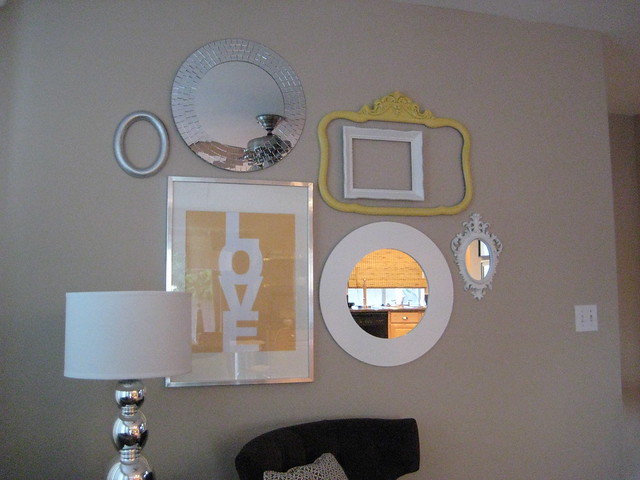
This is what I hung up when we first moved in, yikes. Mostly I used items I already had, and then I spray painted a couple of thrift store finds. It's not good.
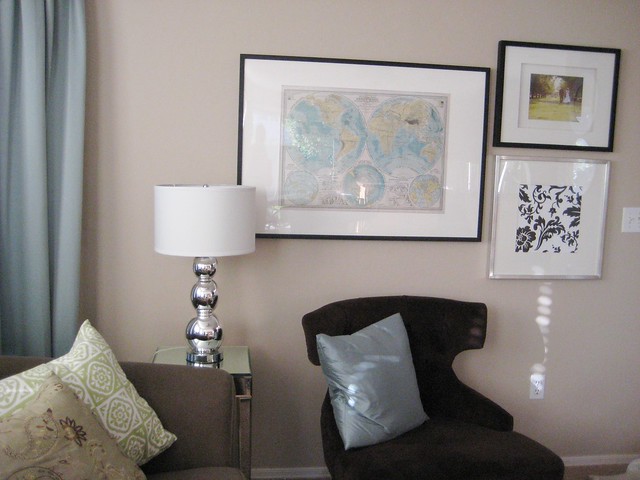
Here's what I did next, I decided I needed some bigger pieces. Better I guess, but still scary.
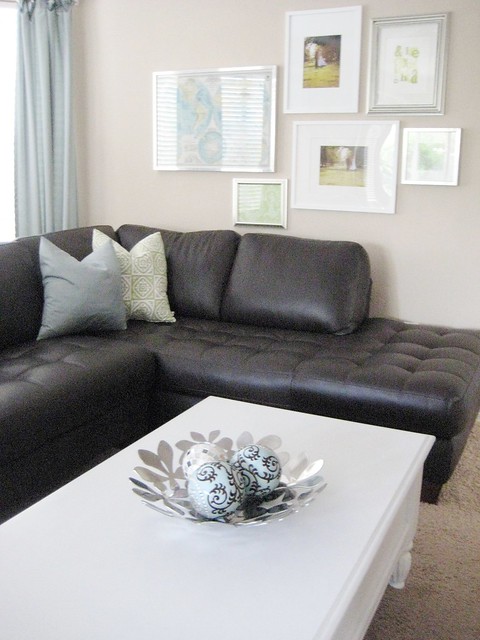
After we bought our sectional, I added to the arrangement. It stayed like this for awhile, but I wasn't truly satisfied with it.
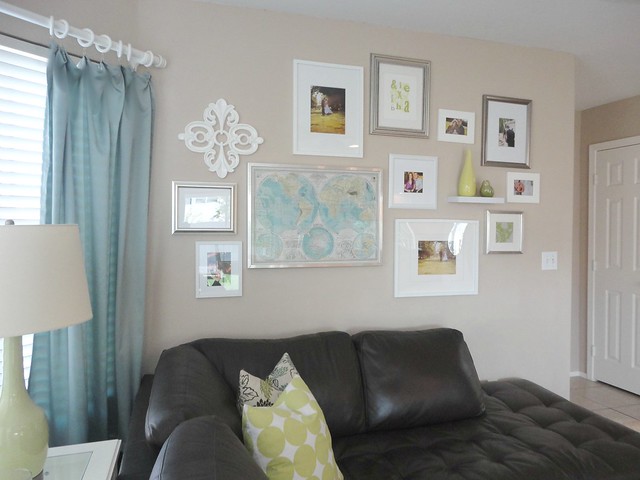
And this is how it looks now. Much better from the original crap fest. But I'm sure I'll change it again eventually.


This just shows how it won't kill you to experiment a little. Yeah like me, you might go through some fugly arrangements; but eventually you'll find something that works.
To illustrate my point, I'm going share with you some really ugly wall arrangements (and crappy photos) by yours truly. One wall in my living room has gone through many changes.
This is what I hung up when we first moved in, yikes. Mostly I used items I already had, and then I spray painted a couple of thrift store finds. It's not good.

Here's what I did next, I decided I needed some bigger pieces. Better I guess, but still scary.

After we bought our sectional, I added to the arrangement. It stayed like this for awhile, but I wasn't truly satisfied with it.

And this is how it looks now. Much better from the original crap fest. But I'm sure I'll change it again eventually.


This just shows how it won't kill you to experiment a little. Yeah like me, you might go through some fugly arrangements; but eventually you'll find something that works.
Making Three Adjoining Rooms Cohesive
My client Katie has a floor plan with three adjoining rooms - her front room, her family/TV room, and her kitchen. We wanted each room to have it's own feel, however they needed to also be cohesive. We did this by using one main color scheme: yellow, blue, green, and gray. However, each room highlights the colors differently.
The front room is yellow, gray, and blue. (The quatrefoil pattern seen here represents a plastic room divider that Katie is custom ordering to be placed between her front room and family room.)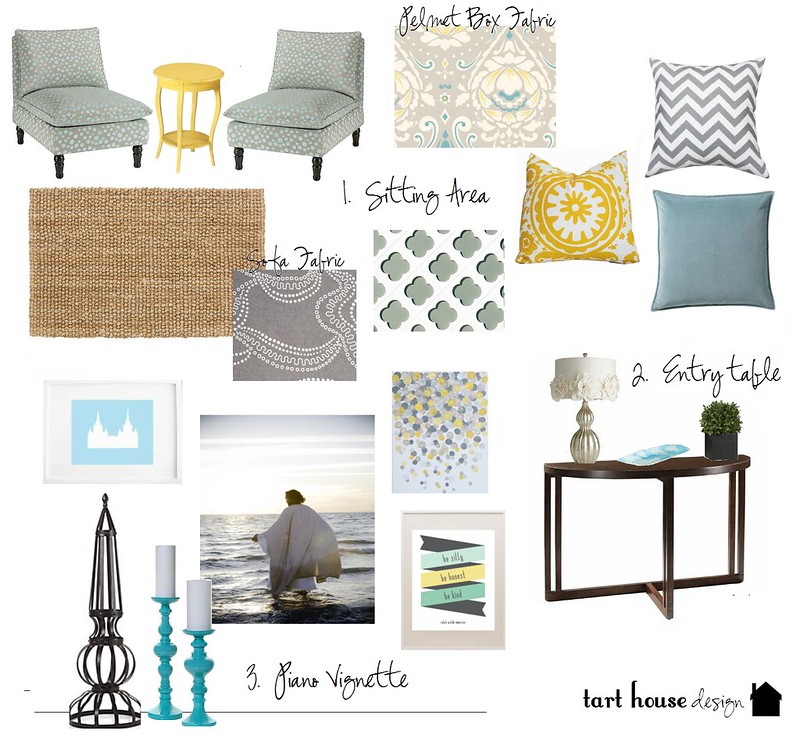
The family room uses mainly blues and greens.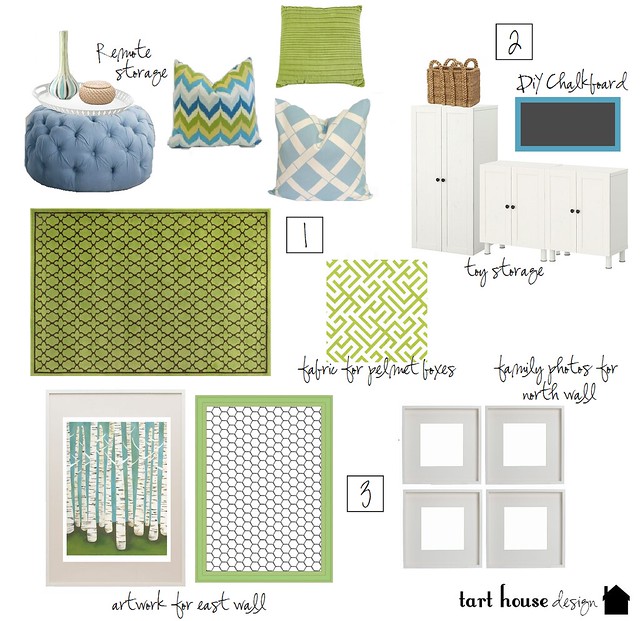
And the kitchen uses all the colors; but sparingly so as to avoid the three spaces getting too busy. The kitchen also includes a small desk/office area.
Out of respect for my client who paid for the room boards, I won't be posting a full source list, but feel free to e-mail me if you have a question about a specific item. Thanks!
The front room is yellow, gray, and blue. (The quatrefoil pattern seen here represents a plastic room divider that Katie is custom ordering to be placed between her front room and family room.)

The family room uses mainly blues and greens.

And the kitchen uses all the colors; but sparingly so as to avoid the three spaces getting too busy. The kitchen also includes a small desk/office area.

Out of respect for my client who paid for the room boards, I won't be posting a full source list, but feel free to e-mail me if you have a question about a specific item. Thanks!
How To Hide Your Computer Cords
Truth bomb: this post will not contain pretty pictures. My office is still very much in progress, but today I organized my computer cords that have been driving me cray cray. My husband hates when I say "cray cray".
Here are my ugly cords, bleh.
I bought some of these "Mug Hooks" at Wal-Mart for about 2 bucks. They are peel and stick.
Then I stuck my hooks along the bottom of my desk like so. I knew the power pack to my lap top was going to be too heavy for the peel and stick hooks, so I attached two screw-in hooks to hang it on.
Here's how it looked once I strung the cords through, and hung up the power pack.
Ta-da!! No more cords!
Alternatives to the Gallery Wall
I'm still seeing gallery walls like the one below everywhere, and I still like them.
But you can't put a gallery display on every single wall in your house or you're gonna look like a crazy person. Here are some other ideas to fill those empty walls. Framed wallpaper.
Enlarge family photos and frame - those are Ikea frames!
Display 9 matching frames in a grid.
Shelves or picture ledges.
Target vs. West Elm Duvet
So I was browsing Target the other day, as I often do, and happened upon this striped duvet cover. I immediately thought of the almost exact same duvet cover that West Elm carries; and of course Target's Queen size version is less than half the price! This is why Target is the best.
Affordable Pillows
While shopping for a room board, I came across this great deal on pillow covers! It's the Nena Von line, available through Amazon! I've seen this seller on Etsy as well. All of the pillow covers pictured are $25 to $35 dollars each, a great price.
Be sure to fill your covers with down pillow inserts, they look the best. Sears has great prices on down pillow inserts, and if you're local, Mesa Sales has them even cheaper.
Be sure to fill your covers with down pillow inserts, they look the best. Sears has great prices on down pillow inserts, and if you're local, Mesa Sales has them even cheaper.


